Andy's blog

If you always do what you've always done, you'll always get what you've always got.

0%

Vue Component(元件)-event bus

參考資料


開始前,我們回憶一下,props、emit的傳遞方式如下圖:
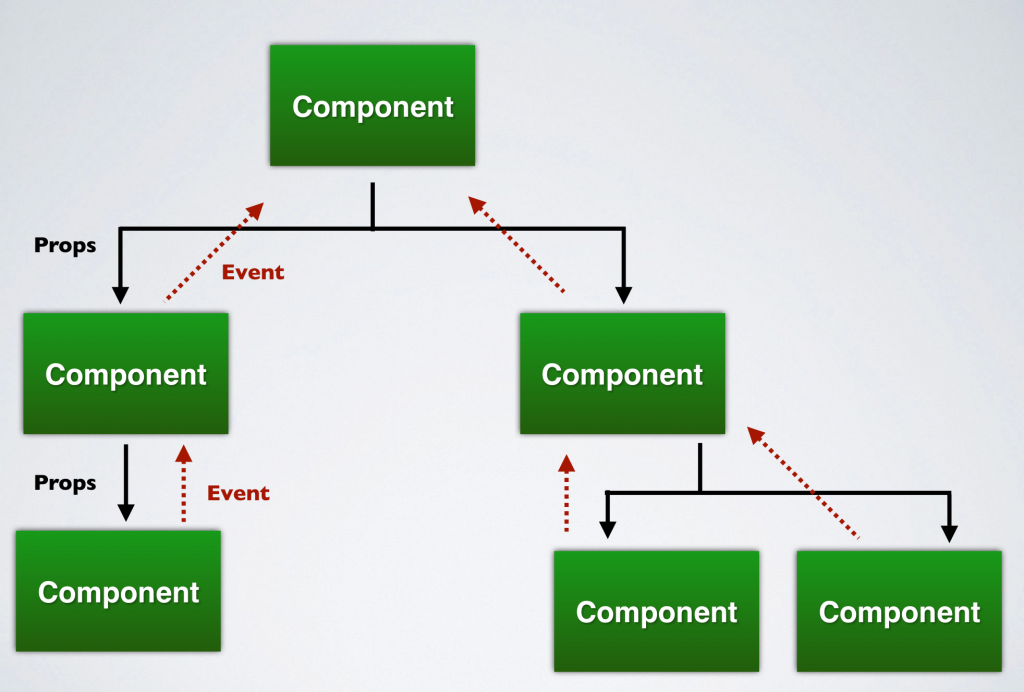
https://ithelp.ithome.com.tw/upload/images/20191007/20114645oids2SPwvH.png圖片來源:五倍紅寶石

我們可以發現資料與資料間的溝通方式,是樹狀傳遞,這代表什麼呢?假設我今天要跟旁邊的component(元件)進行溝通,那我們是不是要先把資料傳到最上層父元素後,再依序傳下來呢?光想就覺得好麻煩,這什麼鬼方法
引用Kuro老師深刻譬喻:

子孫元件要溝通講秘密,卻連上層阿公都知道XD

沒錯,若遇到不是上下階層關係的元件,我們在傳遞資料時候的確相當麻煩,因此這時候就需要老司機來幫助我們解決這個問題摟~


跨層級事件傳遞 event bus

目的:幫助我們將元件間的溝通方式由樹狀結構,轉變成網狀模式。
寫法:
Step1. 新增一個Vue實體var bus = new Vue()
Step2. 透過向bus發送註冊事件($emit),與訂閱事件($on)來完成元件與元件的溝通
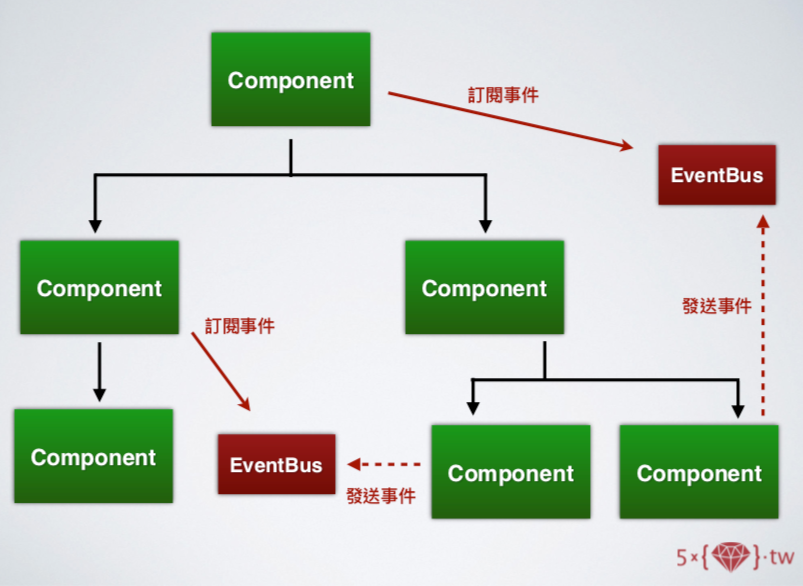
https://ithelp.ithome.com.tw/upload/images/20191007/201146453bzmKDuvpu.png
圖片來源:五倍紅寶石課程
範例:練習連結
HTML部分

1
2
3
4
5
<div id="app">
<custom-one></custom-one>
<hr>
<custom-two></custom-two>
</div>

JavaScript部分

1
2
3
4
5
6
7
8
9
10
11
12
13
14
15
16
17
18
19
20
21
22
23
24
25
26
27
28
29
30
31
32
33
34
35
36
37
38
39
40
41
42
43
44
45
46
47
var bus = new Vue();
//元件一
Vue.component('custom-one',{
template:`<div>
<input type="text" v-model="msg">
<button @click="update">update</button>
</div>`,
methods:{
update(){
bus.$emit('receive',this.msg); //向bus發送receive事件
}
},
data(){
return{
msg:'',
}
}
})


//元件二
Vue.component('custom-two',{
template:`
<div>
{{msg}}
</div>
`,
created() {
var self= this;
bus.$on('receive',function(newMsg){ //向bus訂閱事件
console.log(self);
self.msg =newMsg
})
},
beforeDestroy() {
bus.$off('receive') //記得要手動清除監聽事件,不然Vue不會自動幫我們取消喔
},
data(){
return{
msg:''
}
}
})

var app = new Vue({
el: '#app'
});

小結論

1.使用event bus時,要注意事件名稱的命名。避免造成事件重複訂閱!
2.監聽完事件後必須手動清除事件監聽!很重要要講三遍
3.元件與元件之間若為父子關係,應該使用props、emit方法,避免濫用